Leveraging your data files with Sublime Text
I bet your application creates some kind of log file that you inspect manually. Or it uses a data file with a well-known structure.
Have you ever thought Oh dear, this wall of text is unreadable! If only I had some highlighting? Beg no more, because we’re making your dearest dreams come true!
The scenario
Let’s say this is a screenshot of your typical log file when you open it in Sublime Text 3:
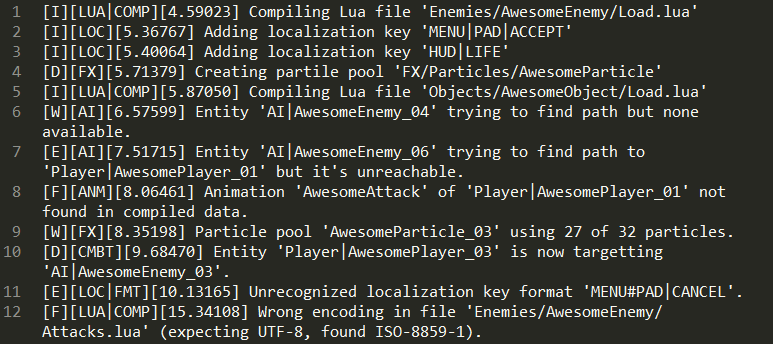
I’d say it is hard to get an idea of what’s really going on unless you are so into the format that you can see blonde, brunette, redhead. What if we could improve it so we highlight some interesting parts?
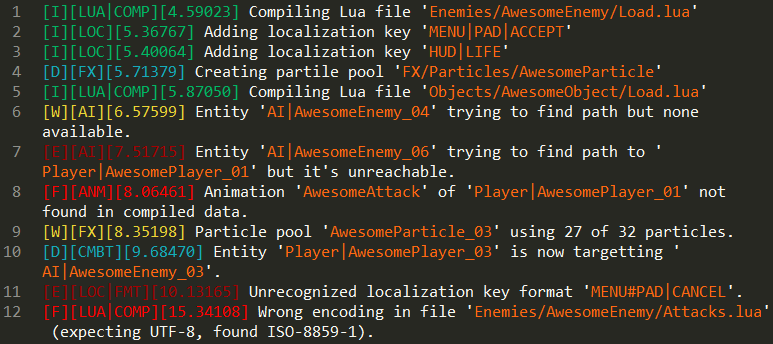
Okay, maybe you don’t like the colors or maybe you would’ve highlighted other stuff. We’ll be learning how to achieve this result so you can roll your own!
Sublime Text 3
First of all, you need to get yourself a copy of Sublime Text 3. If you haven’t heard of this awesome text editor, head over to their home page and learn some of its interesting features.
Syntax files
Sublime Text lets you create your own syntax definitions and its highlighting through their own data files. Each syntax definition mainly consists of 2+1 files:
- .sublime-syntax file: defines the structure of the syntax you are targetting.
- .tmTheme file: defines styling for each match you performed within the previous file.
- .sublime-settings file: allows the user to create some properties to use when the syntax is in use.
We’ll walk through all of them as we progress through the following section.
Case study: unreadable log files
Okay, so this is the sample log file we have:
[I][LUA|COMP][4.59023] Compiling Lua file 'Enemies/AwesomeEnemy/Load.lua'
[I][LOC][5.36767] Adding localization key 'MENU|PAD|ACCEPT'
[I][LOC][5.40064] Adding localization key 'HUD|LIFE'
[D][FX][5.71379] Creating partile pool 'FX/Particles/AwesomeParticle'
[I][LUA|COMP][5.87050] Compiling Lua file 'Objects/AwesomeObject/Load.lua'
[W][AI][6.57599] Entity 'AI|AwesomeEnemy_04' trying to find path but none available.
[E][AI][7.51715] Entity 'AI|AwesomeEnemy_06' trying to find path to 'Player|AwesomePlayer_01' but it's unreachable.
[F][ANM][8.06461] Animation 'AwesomeAttack' of 'Player|AwesomePlayer_01' not found in compiled data.
[W][FX][8.35198] Particle pool 'AwesomeParticle_03' using 27 of 32 particles.
[D][CMBT][9.68470] Entity 'Player|AwesomePlayer_03' is now targetting 'AI|AwesomeEnemy_03'.
[E][LOC|FMT][10.13165] Unrecognized localization key format 'MENU#PAD|CANCEL'.
[F][LUA|COMP][15.34108] Wrong encoding in file 'Enemies/AwesomeEnemy/Attacks.lua' (expecting UTF-8, found ISO-8859-1).
As we can see, there’s a common pattern going on:
[log_level][category][timestamp] Log dataLet’s start with a simple syntax definition and work from there.
Bootstrap
First of all, we’re going to create the 2+1 files we mentioned before.
Navigate to Sublime Text’s Packages folder (%appdata%\Sublime Text 3\Packages in Windows, ~/.config/sublime-text-3/Packages in Linux) and create a folder called AwesomeCodingScarsLog. Let’s now add the barebones files.
AwesomeCodingScarsLog.sublime-syntax
Create it and paste this code:
%YAML 1.2
---
scope: acsl
contexts:
  main:
    - match: '.+'
Here we’ll define our syntax rules.
AwesomeCodingScarsLog.tmTheme
Create it and paste this code:
<?xml version="1.0" encoding="UTF-8"?>
<!DOCTYPE plist PUBLIC "-//Apple Computer//DTD PLIST 1.0//EN" "http://www.apple.com/DTDs/PropertyList-1.0.dtd">
<plist version="1.0">
<dict>
  <key>name</key>
  <string>AwesomeCodingScarsLog</string>
  <key>settings</key>
  <array>
    <dict>
      <key>settings</key>
      <dict>
        <key>background</key>
        <string>#272822</string>
        <key>caret</key>
        <string>#F8F8F0</string>
        <key>foreground</key>
        <string>#F8F8F2</string>
        <key>invisibles</key>
        <string>#3B3A32</string>
        <key>lineHighlight</key>
        <string>#3E3D32</string>
        <key>selection</key>
        <string>#49483E</string>
        <key>findHighlight</key>
        <string>#FFE792</string>
        <key>findHighlightForeground</key>
        <string>#000000</string>
        <key>selectionBorder</key>
        <string>#222218</string>
        <key>activeGuide</key>
        <string>#9D550FB0</string>

        <key>bracketsForeground</key>
        <string>#F8F8F2A5</string>
        <key>bracketsOptions</key>
        <string>underline</string>

        <key>bracketContentsForeground</key>
        <string>#F8F8F2A5</string>
        <key>bracketContentsOptions</key>
        <string>underline</string>

        <key>tagsOptions</key>
        <string>stippled_underline</string>
      </dict>
    </dict>
    <!-- our custom styles here -->
  </array>
</dict>
</plist>
This is the base file for the Monokai color scheme. Here we’ll add our styling.
AwesomeCodingScarsLog.sublime-settings
Create it and paste this code:
{
  "color_scheme": "Packages/AwesomeCodingScarsLog/AwesomeCodingScarsLog.tmTheme",
}
This defines settings that override the current ones when this syntax is selected. It tells Sublime Text to use our .tmTheme automatically when we select the syntax, so the styling is kept separate in that file.
Set up sample log file
Open Sublime Text with the sample log file we mentioned before and select the syntax we’re going to define. You can do it by either pressing Ctrl+Shift+P and then writing Syntax AwesomeLog in the field that appears on screen, or you can go to the bottom right corner and select the syntax manually from the list.
When you can read AwesomeCodingScarsLog in the bottom right corner of Sublime Text while the focus is on our sample log file, you are ready to continue.
First step: understand the format
Open AwesomeCodingScarsLog.sublime-syntax. Let’s check what we pasted previously:
%YAML 1.2
---
scope: acsl
contexts:
  main:
    - match: '.+'
First lines declare it’s a YAML file. It’s mandatory for the syntax to be parsed.
The scope property defines a name that’s assigned to a match when applying styling. In this case, it’s the base styling for the syntax. A scope can have nesting, specifying scopes from least to most specific and applying them in a cascading fashion. If you want to know more, check Sublime Text’s official docs on this feature.
After the global scope definition we find the contexts definition. Each one, in turn, defines a list of regular expressions that match the lines in your file. When a match is found, we can modify the stack or apply styling.
So, let’s add the first one!
Everything is unexpected
This step is a temporal one that we’ll use to ensure we’re on the right track as we go.
Modify the only entry in the main context so it is:
# unexpected
- match: '.+'
  scope: acsl.unexpected
This means we’re tagging everything with the ascl.unexpected style. However, that’s still not defined. Let’s fix that!
Open AwesomeCodingScarsLog.tmTheme and add this definition in the place where we had a comment:
<dict>
  <key>name</key>
  <string>Unexpected</string>
  <key>scope</key>
  <string>acsl.unexpected</string>
  <key>settings</key>
  <dict>
    <key>background</key>
    <string>#FF0000</string>
  </dict>
</dict>
With this, now we’ve got this lovely file:
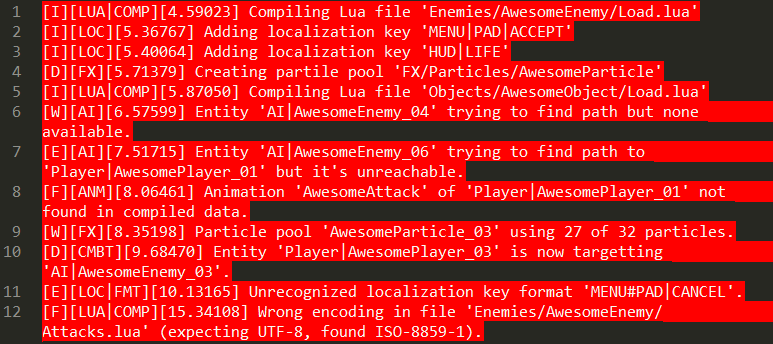
This is our starting point. We’ll have a nice way of knowing we’re missing some matchings.
Log levels
Now it’s time for us to match something: the log levels. We know the format is [log_level] and that they are either D (debug), I (info), W (warning), E (error) or F (fatal).
In the .sublime-syntax file we’re going to define matches for these, so inside the main context but before the acsl.unexpected match, insert the following code:
# debug
- match: '^(\[D\])(.+)$'
  scope: acsl.line
  captures:
    1: acsl.debug
We’re capturing the [D] log level and the rest of the line. The scope property is applied to the whole match and the captures list defines specific scopes for each capture group in the regular expression. This way, the [D] tag will have the acsl.debug scope and the rest of the capture will have the acsl.line one.
This will yield this highlighting:
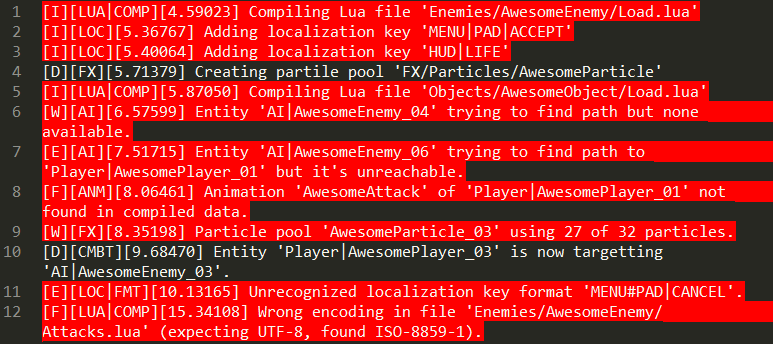
Repeat this match with the rest of the tags (using acsl. + info, warning, …) and we’ll have the following file:
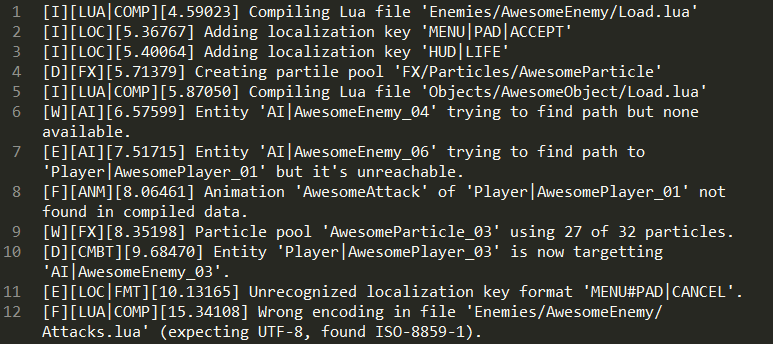
Nice! Now everything in the file is expected, but there’s no styling yet!
Styling log levels
Let’s start with the acsl.debug scope. In the .tmTheme file, where we left the comment, paste this code:
<dict>
  <key>name</key>
  <string>Debug</string>
  <key>scope</key>
  <string>acsl.debug</string>
  <key>settings</key>
  <dict>
    <key>foreground</key>
    <string>#16ACBA</string>
  </dict>
</dict>
Do it again for each other log level with the following colors:
acsl.info:#00B764acsl.warning:#EDD436acsl.error:#A50101acsl.fatal:#FF0000
You’ll now have this style:
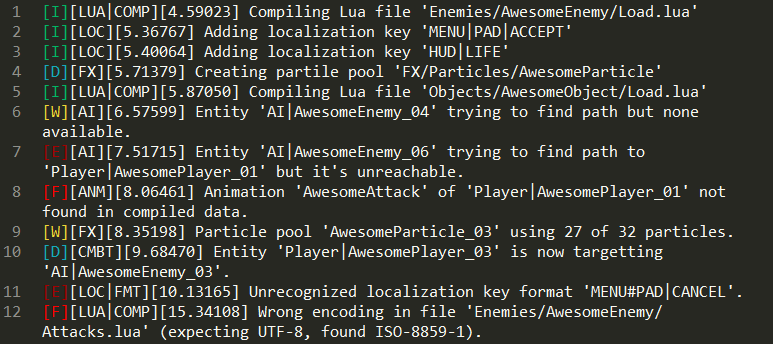
Great job, it’s starting to take shape! What if we extend the style in the log levels to the rest of the tags before the real log line?
Styling tag and timestamp
Back in the .sublime-syntax file, find the debug match and update it like so:
# debug
- match: '^(\[D\])(\[.+\])(\[.+\])(.+)$'
  scope: acsl.line
  captures:
    1: acsl.debug
    2: acsl.debug
    3: acsl.debug
Update all other matches to account for the new match and captures additions and you’ll have this highlighting:
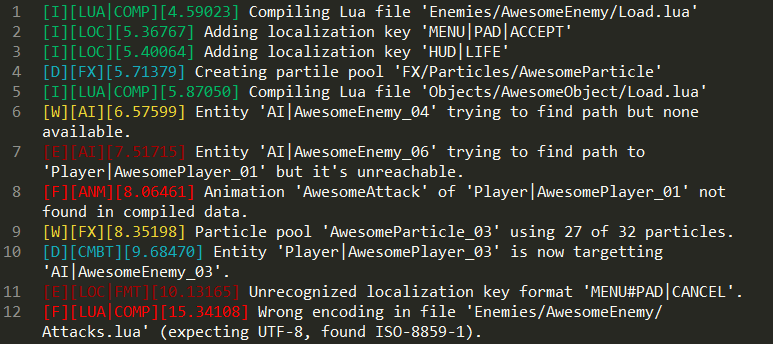
Nice! Isn’t it easier to see which kind of messages you’re having in the file?
Styling important data
Before we call it a day, we’d like to highlight everything that’s between the single quotes because, for us, they are important and deserve attention. Let’s add this match after all of our log level match definitions:
# singly quoted
- match: "'([^']+)'"
  captures:
    1: acsl.singly-quoted
And this style:
<dict>
  <key>name</key>
  <string>Singly quoted</string>
  <key>scope</key>
  <string>acsl.singly-quoted</string>
  <key>settings</key>
  <dict>
    <key>foreground</key>
    <string>#FF6811</string>
  </dict>
</dict>
We save and… Nothing changes. Why is that?
When Sublime Text tries to match a new line it tests all matches in the context. Some of them may match, and they will do it at different positions. For our scenario, the ^(\[D\])(\[.+\])(\[.+\])(.+)$ pattern matches at the start of the line, while the '([^']+)' pattern does it somewhere in the middle of the line. Sublime Text then uses the match with the leftmost start or, in case of a draw, the first that was defined.
So, first of all, let’s modify the debug match to be like this:
# debug
- match: '^(\[D\])(\[.+\])(\[.+\])'
  scope: acsl.debug
This way we only match tags until the timestamp. Notice how we’ve dropped the $ symbol and how we’ve ditched the captures list altogether: everything in the capture will have the same style. When Sublime Text tries to match the '([^']+)' pattern, this one won’t trigger and it will safely work! You can modify the other captures so they have these changes.
So, we save again and we see this:
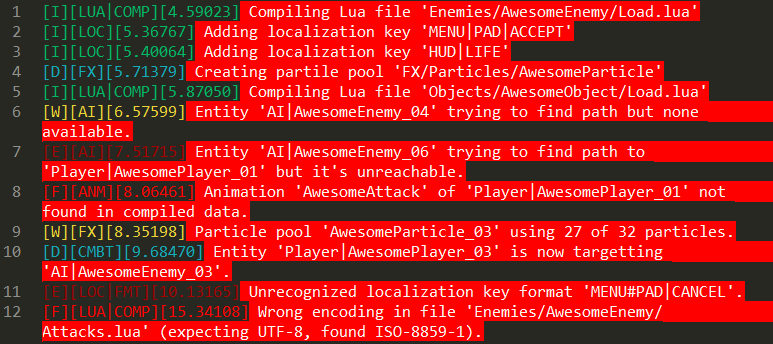
Oh, no! Didn’t we fix it?
It’s the same problem, but between the .+ pattern and the '([^']+)' one. The former matches everywhere! In fact, if it wasn’t the last one (i.e. it was before the fatal definition) it would be selected instead of the log ones!
Enter several contexts
Okay, so we know we’ve matched the start of each line, and those patterns will be preferred instead of the unexpected one because of definition order. What if we could say Okay, this is a log line, it has these tags, and after the timestamp there’s the real log data and we’ll style it separately? That’s what we’ll achieve by manipulating the context stack.
Modify the debug match (and the other levels’) to be like this:
# debug
- match: '^(\[D\])(\[.+\])(\[.+\])'
  scope: acsl.debug
  push: log_line
It says: when you match this pattern, apply the acsl.debug scope to the match and then push the log_line context into the stack. And where’s the log_line context, you say?
contexts:
  log_line:
    - match: '$'
      pop: true

  main:
    ...
It’s defined as an entry in the contexts mapping. When it’s in the stack, only this context will be processed until we modify the stack. So, we need to stop using it at some point or we won’t use the main one again!
That’s what the match: '$' does. When we get to the end of the line (because our log files are single-lined), we pop the context so we go back to the previous one (the main context, in this case).
Now, move the single quotes match into the log_line context and remove it from the main one. You will have this:
log_line:
  - match: "'([^']+)'"
    captures:
      1: acsl.singly-quoted

  - match: '$'
    pop: true
Now, we’d see this:

Yay! Congratulations, now you know Kung-Fu! :)
Bonus: Sahkab dialog files
Back in 2012, some friends and I started a prototype for a videogame called Sahkab. It was a top-down adventure set in a sci-fi universe.
Because we were eager to learn, we built our custom scripting language (aimed at the programmers) and our custom dialog file format (aimed at the writer).
This is a sample screenshot of one of the dialog files, properly highlighted:
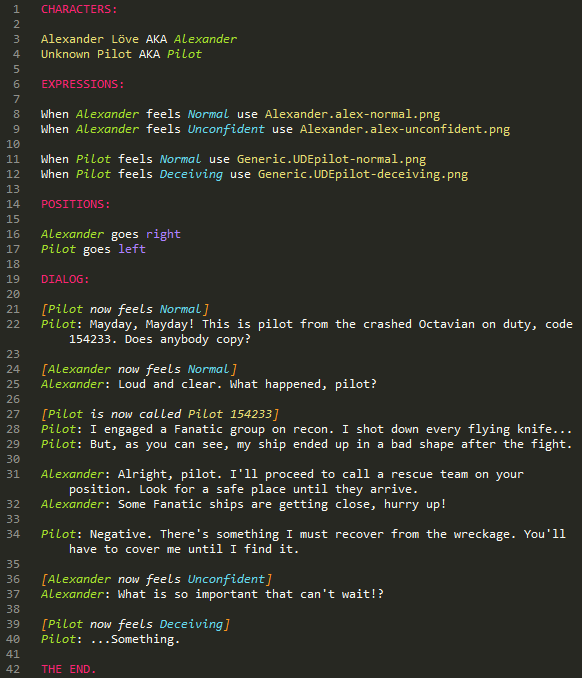
I wish we had it when we were working on the prototype, as I can tell you it was a bit less intuitive to write them with a white-only text :)
I hope this post motivates you to build your own syntax definitions to help yourself and your team!
You can find the code we’ve been writing here.
Thanks for reading!
