
Log window from scratch: C++ to C# interoperability
Log window from scratch
Hello and welcome to the last entry in the series!
So far we’ve gone through the process of building a WPF live log window we could use from other C# projects. We made it a Class Library and used it from a host program also written in C#.
This time, we’ll learn how we can have a C++ project use it. Yeah, that’s right: we’ll be calling C# from C++!
Let’s do it!
Overview
Before we dive into creating projects, configurations and code, let’s have a look into what we’ll need.
First of all, our WPF log window is C# code. If we were to categorize it by how memory is dealt with, we’d call it managed. This is because we create memory via new and the Garbage Collector will know when to free it.
Second, our new host program will be C++ code. However, because there’s no Garbage Collector of any sort, we can call it unmanaged. We can also call it native code.
So, you could say: how can we invoke C# code from C++ code? The short answer is you can’t, directly. Fortunately for us, there’s a long answer!
C++/CLI
There’s a language called C++/CLI that we could basically say is C++ with new functionality to deal with .NET languages via Common Language Infrastructure. We could call this kind of code mixed.
Knowing this, we could have C++/CLI code sitting in between of C++ and C#, like in this diagram:
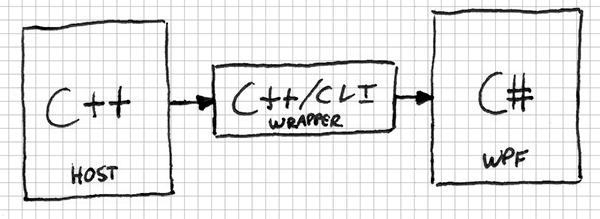
With this picture in mind, these will be the steps:
- Create a C++ project with the typical Hello, world!
- Create a C++/CLI project with a not-so-typical Hello, mixed world!
- Connect these two so we can invoke the mixed one from the unmanaged one.
- Connect the mixed project with our managed WPF one.
C++ host program
Let’s start by adding a new C++ project to our solution: right-click it, then Add -> New project… and choose Win32 Console Application from the Visual C++ filter. Give it a descriptive name like NativeHostProgram. From the wizard select Empty project.
Now, create the typical Main.cpp:
int main(int argc, char **argv)
{
    std::cout << "Hello, world!" << std::endl;
    return 0;
}
Set this project as the startup project and run it. So far, so good. Next step?
C++/CLI bridge project
We’ve set our C++ project as the main one, so we can’t do the same for this C++/CLI project. Instead, we’ll use it from the native one, and that means it must be a library.
Again, right-click on the solution then Add -> New project… but this time, under Visual C++ select the CLR group. The only project type we’re given that matches our requirement is a Class Library, so let’s create that one. Give it a nice descriptive name, like LogWindowMixedBridge.
By doing so, Visual Studio will also create LogWindowMixedBridge.h and LogWindowMixedBridge.cpp for us. I prefer deleting them to start from scratch once again.
Let’s instead create a nice and simple Bridge.h with this code:
#pragma once

#include <iostream>

void helloMixedWorld()
{
    std::cout << "Hello, mixed world!" << std::endl;
}
To be able to invoke this helloMixedWorld we must first connect the two projects together. But, how can we do that?
Referencing bridge from native
When we chose Class Library while creating our C++/CLI project we were in fact creating a DLL, so we must follow the usual process for linking DLLs. This time, we’ll use the Implicit Linking method.
Let’s change our Bridge.h file to:
#pragma once

#ifdef MIXED_MODE_DLL_EXPORT
#define MIXED_BRIDGE_API __declspec(dllexport)
#else
#define MIXED_BRIDGE_API __declspec(dllimport)
#endif

MIXED_BRIDGE_API void helloMixedWorld();
And a Bridge.cpp file with:
#include "Bridge.h"

#include <iostream>

MIXED_BRIDGE_API void helloMixedWorld()
{
    std::cout << "Hello, mixed world!" << std::endl;
}
Which will yield this error:
Error: a function declared ‘dllimport’ may not be defined.
This is because MIXED_MODE_DLL_EXPORT isn’t defined, which means we’re declaring the helloMixedWorld as dllimport. However, DLL projects must use dllexport for their functions so other projects use dllimport. So, where can we define MIXED_MODE_DLL_EXPORT?
Right-click the LogWindowMixedBridge project and select Properties. Under C/C++ > Preprocessor > Preprocessor definitions then add MIXED_MODE_DLL_EXPORT.
With this, the error has gone away!
Now, compile the LogWindowMixedBridge project alone. It should complete with no errors and will have created two files we’re interested in: LogWindowMixedBridge.dll and LogWindowMixedBridge.lib. These, alongside the Bridge.h file are the three things we need to implicitly link this DLL.
Implicit Linking
We said we needed three things to be able to reference this DLL from our NativeHostProgram:
- Have access to the
.hfiles with declarations. - Have access to the
.libfile to perform the link. - Have access to the
.dllfile.
With this, it’s pretty much working as a static library although it is a DLL.
Right-click NativeHostProgram, select Properties and perform these steps (we’re using paths from the default Visual Studio configuration):
- Update C/C++ > Additional Include Directories:
%(SolutionDir)LogWindowMixedBridge\;%(AdditionalIncludeDirectories). - Update Linker > Additional Dependencies > Input:
LogWindowMixedBridge.lib;and all of the previous values. - Update Linker > General > Additional Library Directories:
$(SolutionDir)\$(Configuration)\;%(AdditionalLibraryDirectories)for Win32 and$(SolutionDir)$(Platform)\$(Configuration)\;%(AdditionalLibraryDirectories)for x64.
Last, but not least, we must tell the solution that NativeHostProgram depends on LogWindowMixedBridge. To do so, right-click the solution, select Properties and under Project Dependencies select NativeHostProgram and check LogWindowMixedBridge. From now on, when we compile the solution it will first compile LogWindowMixedBridge and then NativeHostProgram.
Well, we’ve linked everything so we can go back to Main.cpp in NativeHostProgram and update it with:
#include <Bridge.h>

int main(int argc, char **argv)
{
    helloMixedWorld();
    return 0;
}
Run the solution and you’ll have an impressive message in your console saying the Hello, mixed world! message!
Phew! It was intense! Well done :)
Connecting C++/CLI to C#
Nice! We know how to connect C++ with C++/CLI, but how about going from C++/CLI to C#? The answer is in fact pretty simple: reference it!
To do so, expand our LogWindowMixedBridge project, right-click References, select Add Reference… and then check our LogWindowUI project (which, if you remember from previous entries, is our C# WPF project).
Now we can update our Bridge.cpp file with this code:
#include "Bridge.h"

MIXED_BRIDGE_API void helloMixedWorld()
{
  LogWindowUI::LoggerUI::Initialize(0, 0, 500, 300);
  LogWindowUI::LoggerUI::Instance->Add(0.0f, "DEBUG", "TEST", "Hello, WPF!");

  // required so we can see the window for a bit
  System::Threading::Thread::Sleep(5000);
}
Run it and you’ll get this:
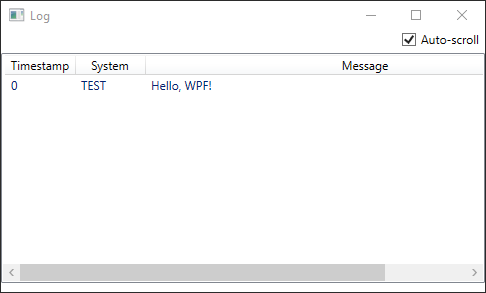
Impressive! It may look like no big deal, but we’ve shown our log window from a code that started at C++! Now, for the last bit!
Bridge revisited
Alright, we’re awesome because we communicated C++ with C#, but for now it’s just a function! Why don’t we design it a bit and make our C++ program configure the C# WPF window and log some stuff?
Our LoggerUI class, which belongs to C#, has methods to deal with the window like Initialize, ConfigureSystems or Add. Wouldn’t it be awesome to have some kind of wrapper in our C++/CLI project to call them from C++? We’re doing that now.
Let’s modify our Bridge.h file with this:
#pragma once

#ifdef MIXED_MODE_DLL_EXPORT
#define MIXED_BRIDGE_API __declspec(dllexport)
#else
#define MIXED_BRIDGE_API __declspec(dllimport)
#endif

#include <vector>

class MIXED_BRIDGE_API Bridge
{
public:
  Bridge(int x, int y, int w, int h);
  ~Bridge();

  void configureSystems(std::vector<const char *> systems);
  void configureLevels(std::vector<std::pair<const char *, const char *>> levels);

  void log(const char *level, float timestamp, const char *system, const char *message) const;
};
Notice how we can export a whole class with the DLL, not just free functions. As you can see, its methods mostly map those at LoggerUI. Why don’t we see some of the implementations?
Bridge::Bridge(int x, int y, int w, int h)
{
  LogWindowUI::LoggerUI::Initialize(x, y, w, h);
}

Bridge::~Bridge()
{
  LogWindowUI::LoggerUI::Destroy();
}
Nothing pretty fancy here, right? What about configureSystems, for example?
void Bridge::configureSystems(std::vector<const char *> systems)
{
  typedef System::Collections::Generic::List<System::String ^> tManagedStringList;
  tManagedStringList ^systemsManaged = gcnew tManagedStringList();
  for (const char *s : systems)
  {
    systemsManaged->Add(gcnew System::String(s));
  }

  LogWindowUI::LoggerUI::Instance->ConfigureSytems(systemsManaged);
}
This is what our Bridge is all about: translating stuff from C++ to C#. See how we’re converting the const char * to String? Okay, but you may say: what’s that String ^ or gcnew?
The ^ symbol represents a pointer to managed memory, and that memory must be created somewhere. That’s where gcnew comes into play: creates memory handled by the Garbage Collector. We could say they are the managed counterparts of * and new.
LoggerUI as a Singleton
By now you’ve already noticed we’re enforcing having a single LoggerUI instance because it’s a Singleton. However, nothing prevents us from creating several Bridge instances! We could create two of them and then an assert would trigger because we’d be trying to call LoggerUI::Initialize twice!
We could fix it by ditching out the Singleton pattern at this level and having our Bridge wrapper have a private LoggerUI member. However, it’s a bit more convoluted than I wanted to dive into when I started this post so we’ll keep it out of scope.
Long story short, it requires creating a BridgePrivate class to be used by Bridge (pretty much like the PIMPL) with a member of type gcroot<LoggerUI ^>. The reason is we can’t expose a C++/CLI class to C++ with pointers to managed memory, so we must hide it in the private class.
Putting it all together
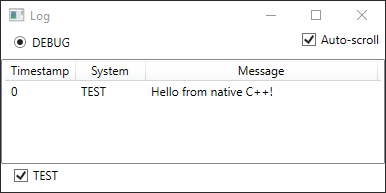
The only thing we’re missing is calling all this from C++! Let’s update Main.cpp with this:
#include "Bridge.h"

#include <chrono>
#include <thread>

int main(int argc, char **argv)
{
  std::vector<const char *> systems;
  systems.push_back("TEST");

  std::vector<std::pair<const char *, const char *>> levels;
  levels.push_back(std::pair<const char *, const char *>("DEBUG", "#000000"));

  Bridge *bridge = new Bridge(0, 0, 400, 200);
  bridge->configureSystems(systems);
  bridge->configureLevels(levels);

  bridge->log("DEBUG", 0.0f, "TEST", "Hello from native C++!");

  std::this_thread::sleep_for(std::chrono::seconds(20));
  delete bridge;

  return 0;
}
And this is the result:
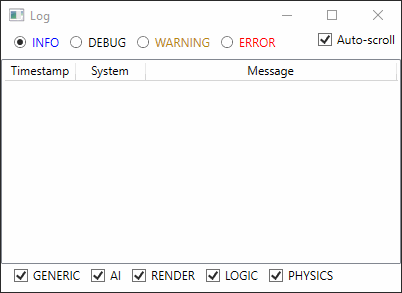
What if we configured more levels and more systems? What if we logged messages with random level and system? What if we recorded it into a GIF?
Congratulations! You’re now logging messages from C++ to a WPF window written in C#!
Wow, so that’s the end of the series! We’ve gone through the process of creating a WPF live log window which we can use from C# and C++ projects. We’ve started from nothing and got to the previous GIF showing the result, and what a result! :)
The only thing that’s left is using it in other real projects! What are you waiting for?
Thanks a lot for reading!