
Log window from scratch: from standalone to class library
Log window from scratch
Hello again! I was waiting for you to continue with our Log Window!
In the last post we created the basic UI and functionality. However, that window does little by itself so we want to convert it into a component we can plug into other projects. That way, we could focus on building a nice project with the help of a logging window!
Grabbed a drink? Then we’re ready to start!
The host program
We said we wanted to use the window from another project, right? Why don’t we start building that first?
Let’s add a new C# project into our solution. This time, we don’t want a WPF Application but a Console Application. Let’s give it a meaningful name… like HostProgram.
We’ll have a new project with a new autogenerated Program.cs file. Let’s keep it and modify its Main to something familiar:
static void Main(string[] args)
{
    Console.WriteLine("Hello, world!\n");
}
Now, set this project as the startup project: one way is to right-click on the project then select Set as StartUp Project. Then run the solution and you’ll have the expected message in the console. Nothing new here.
What if we wanted to use the LogEntry class we created in our LogWindowUI project? Can we do this?
static void Main(string[] args)
{
    LogEntry entry = new LogEntry
    {
        Timestamp = 0.0f,
        System = "TEST",
        Message = "Sample message!"
    };

    Console.WriteLine("[{0}][{1}] {2}",
        entry.Timestamp, entry.System, entry.Message);
}
Unfortunately we can’t… yet.
Referencing projects
For our HostProgram to be able to use classes from the LogWindowUI project we need to connect them somehow. To do so, expand the HostProgram project and right-click References, select Add Reference.... Now enable the checkbox next to the LogWindowUI project and accept the dialog.
Our code still doesn’t compile, but now we can add this line:
using LogWindowUI;Because, if you remember, our LogEntry class was defined inside a namespace called LogWindowUI.
We can happily run our solution now and the formatted log message will show up in the console. We’re getting there!
Breaking it up
Okay, we’ve connected our projects but our LogWindowUI one is still a Windows Application and we want to make it a Class Library. We’ll do that now, but first you should know everything will be broken until we complete some steps.
Start by opening the Properties page in the project (one way is double-clicking the Properties entry when you expand the project). Select Class Library from the Output type control, then save.
You will now see several errors in the Error List panel. The first one says:
Library project file cannot specify ApplicationDefinition element.
Removing App.xaml
Do you remember, from previous post, that the startup of the UI felt like Magic because we apparently never said where it should start? Remember the two concepts we discussed: Application and Window?
One of the files, App.xaml, defines the entry point and which Window to display when we launch the program. Because we’ll be using this project as a Class Library, the host program will be responsible of managing the life cycle itself. We’ll just provide tools for it to work. So, delete App.xaml and the error will go away.
Except not! It looks like it has deleted App.xaml.cs as well and we don’t have an Application anymore!
Creating App.cs
Let’s add a new class called App in our LogWindowUI project with this code, pretty similar to what App.xaml.cs had:
namespace LogWindowUI
{
    class App : Application
    {
    }
}
With this, all errors will go away and we can run our console-based hello log. Impressive :)
But, how do we connect them now?
Showing window from host program
So far we’ve gained access to the classes in the LogWindowUI project from the HostProgram one. However, we’re left with a sad log message in the console and no WPF window.
To keep things clean, we should expose some class that lets us create the window, send it messages and close it when necessary instead of dealing with the internal classes from the outside. We only want to have one window at the same time, so… guess which design pattern we’ll be using?
Singleton pattern
You may have heard of the Singleton pattern before. It allows us to restrict the instantiation of a class to a single object. It’s used when it doesn’t make sense to have several instances of one class, commonly when you’re defining a manager of some sorts or a wrapper to an underlying system which should have a single entry point.
Bob Nystrom (@munificentbob), in his Game Programming Patterns, has an awesome chapter about the pattern so go and read it if you want to know the good and bad parts about it.
A simple C# implementation of the pattern is this one:
public sealed class LoggerUI
{
    private static LoggerUI m_instance = null;
    public static LoggerUI Instance
    {
        get
        {
            if(m_instance == null)
            {
            	m_instance = new LoggerUI();
            }
            return m_instance;
        }
    }

    private LoggerUI()
    {
    }
}
However, this lazy initialization (the instance isn’t created until the first piece of code accesses it by using the Instance property) takes life cycle control from us (and isn’t thread safe). We’d want to explicitly control when the instance is created and when it’s destroyed. Let’s make it so:
public sealed class LoggerUI
{
    private static LoggerUI m_instance = null;
    public static LoggerUI Instance
    {
        get
        {
            Debug.Assert(m_instance != null, "LoggerUI not initialized");
            return m_instance;
        }
    }

    private LoggerUI()
    {
    }

    public static void Initialize()
    {
        Debug.Assert(m_instance == null, "LoggerUI already initialized");
        m_instance = new LoggerUI();
    }

    public static void Destroy()
    {
    	Debug.Assert(m_instance != null, "LoggerUI already destroyed!");
        m_instance = null;
    }
}
This way, we control the life cycle ourselves. It isn’t thread safe either, but we’ll be sure to Initialize and Destroy in a single-thread part of the program. Let’s also add a new method to test it:
public void Add(string message)
{
    Console.WriteLine(message);
}
Calling from host
For now, our host program just has a Main function from which we’ll call everything:
static void Main(string[] args)
{
    // intialization step
    LoggerUI.Initialize();

    // [...] some other code in our program

    LoggerUI.Instance.Add("Hello, world!");

    // [...] some other code in our program

    // teardown step
    LoggerUI.Destroy();
}
And it works as expected, yay! Now, let’s show the window again!
STA, Application and Window
Remember the App.xaml file we had before we broke everything? If we stripped it a bit we’d have this:
<Application x:Class="LogWindowUI.App"
             StartupUri="MainWindow.xaml">
</Application>
Which is telling the runtime to use the LogWindowUI.App class as the Application and then display the Window defined at MainWindow.xaml (whose x:Class attribute points to MainWindow.xaml.cs).
So it looks like we need an Application that displays a Window. Okay, what else?
In the previous post we mentioned WPF uses the Single Thread Apartment model: any object created within a thread can only be modified from that thread (the UI Thread). Guess we need one of those too.
We’ve defined our LoggerUI singleton class as the entry point to our WPF library. We could have the Application as a member of LoggerUI and tie its creation to the creation of the singleton itself. Something like this:
private App m_application = null;

private LoggerUI()
{
    Thread t = new Thread(() =>
    {
        m_application = new App();
        m_application.Run(new MainWindow());
    });
    t.SetApartmentState(ApartmentState.STA);
    t.Start();
}
Basically, just what we said we’d do. But there’s a catch.
When we run this code, it’s not guaranteed the Application and its Window are running after we call LoggerUI.Initialize() (which ends up calling the constructor and thus this code). If we were to start logging stuff right after calling Initialize it could fail because m_application could be uninitialized. Ah, the joy of multithreading.
One way of solving this issue is to wait for the Application to be ready. After all, it’s part of the initialization process. We can use an AutoResetEvent to wait in our main thread until the Application and Window are running. We could rewrite the constructor with this code:
private LoggerUI()
{
    AutoResetEvent windowCreatedEvent = new AutoResetEvent(false);
    Thread t = new Thread(() =>
    {
        m_application = new App();
        MainWindow window = new MainWindow();

        m_application.MainWindow = window;
        m_application.MainWindow.Show();

        // notify they are created before we block this thread
        windowCreatedEvent.Set();

        m_application.Run();
    });
    t.SetApartmentState(ApartmentState.STA);
    t.Start();

    // wait until the application and window are created
    windowCreatedEvent.WaitOne();
}
Note how we’ve separated the Window creation from the Application’s Run method. When you create a Window it starts hidden, so we must call Show ourselves or let Run do it for us. Oh, and Run blocks until the Window is closed, so we must signal the event before doing it. The Application is already created by then so we can start manipulating it.
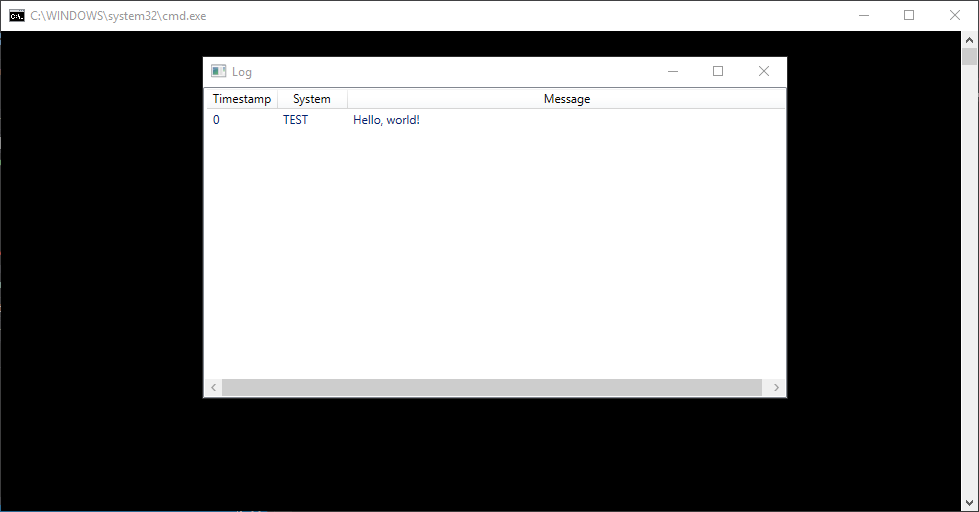
If we were to run the program now we’d see something like this:
All that’s left is sending messages from the host program to our WPF library instead of mocking them!
Connecting logs
As you can see in the previous picture, we had a way of adding messages to the window. For testing purposes we did that in the MainWindow’s constructor. Let’s delete that code now, so there’s nothing sending messages.
Now, in the LoggerUI singleton class, let’s update the Add method:
public void Add(float timestamp, string system, string message)
{
    Debug.Assert(m_application != null);

    // add it to the window via UI thread
    m_application.Dispatcher.BeginInvoke((Action)delegate
    {
        // window can be closed already
        if (m_application.MainWindow == null)
        {
            return;
        }

        (m_application.MainWindow as MainWindow).AddLogEntry(timestamp, system, message);
    });
}
Did you notice the Dispatcher.BeginInvoke thing we mentioned in the previous post?
Also, create MainWindow.AddLogEntry like this:
public void AddLogEntry(float timestamp, string system, string message)
{
    LogEntries.Add(new LogEntry {
        Timestamp = timestamp,
        System = system,
        Message = message
    });
}
Our current code won’t compile if we do this, because in our Main function we’re still using the old version of Add. Let’s fix it:
LoggerUI.Instance.Add(0.0f, "TEST", "Hello, world!");Run it and we have this:
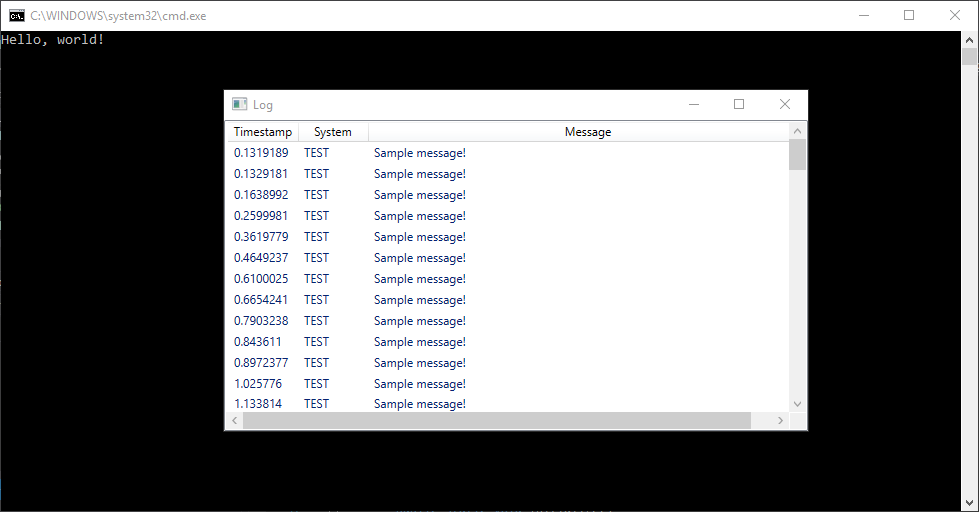
Or we could do this as well:
for(int i = 0; i < 100; ++i)
{
    LoggerUI.Instance.Add(0.0f, "TEST", "Hello, world!");
    Thread.Sleep(100);
}
Yay! It works! Looks like we did it, awesome job!
In this post we’ve managed to convert our WPF project into a Class Library we can plug into other projects and log whatever we want from that project. We’ve also defined a Singleton entry point for the library and created the UI Thread in which the Application and Window live.
In the next entry we’ll work on adding some extra functionality to the window, like colors, filters and auto-scroll.
See you then!